Friday, January 30, 2015

Make Up Organizing

I love make-up as much as the next person, but trying to keep it all tidy and organized is just plain annoying. A few months ago I purchased some plastic trays to store all of my different products in and well just like any other organization project, it didn't work out the first time. So I was sick of looking at the mess so I decided to do something about it.

 
 This system started out alright because everything had a place, but then of course I bought more make-up and there was no "home" for it, so it then morphed into this picture above. See what I mean, everything ended up all over the place.
There were brushes, deodorants, lip glosses, hair clips and hair ties everywhere. I had to sort through half of it just to grab my moisturizer or just to find anything. These trays had once started out as being one for face (big tray on right), one for brushes and eyes (long tray in middle), one for lips and eyeshadows (small tray closer to front) and the other for tools, such as my eyelash curler (smaller tray closer to back).
   So I tipped all of the contents out and re-sorted them into these categories, while going through and throwing out any old or unused item. I then cleaned and dried the trays and placed them back into the drawer. I then placed all of my make-up back into the trays in their categories, making sure to fit them all in nicely.
So now I can see and easily access my make-up without having to hunt for things. So much better don't you think.

How do you organize your make-up? Are there any specific ways you like to store it?


Wednesday, January 28, 2015

College Paper Storage

Hi all,

Earlier this week I showed you my new bookshelf, so today I am going to elaborate on what is in the storage box that I showed you. These boxes can be found here. I especially like them because they are simple, go with everything and wait for it.... They have a label holder (yippee!!).

Inside this box is all of last year handouts (remember semester 1 here is February to June and semester 2 July to October). It even has room for a couple of notebooks, I didn't really get into taking written notes (or any notes) until semester 2.

These boxes are great because they are big enough to hold about the same as two lever arch binders. I label the syllabus with a strip of washi tape and place it at the front of the subject, therefore I know where each subjects starts and finishes.

I also love how the boxes are nicely lined and I got this one cheap because the paper on the front isn't stuck down properly.

How do you store all of your old College Papers? Do you store anything else in a storage box like this?

Friday, January 23, 2015

New Bookshelf

Hello,

I shared my desk last week and I mentioned that I have recently brought a new bookshelf. I am now going to share with you how I styled it (note, it is not completely finished, I still want to buy a new binder and storage box).
 The bookshelf was from Mitre 10 Mega (and seems to be a one and only). I have been looking for a 4 tier cube bookshelf for quite some time and found this one when I went in to look at another that I thought I would have to settle for (ironic much). I wanted somewhere to put my storage box, more on that later this week.

The top shelf holds my planner, the book I am currently reading which can be bought here as well as a room diffuser, a vintage glass and silver vanity jar and a cut glass perfume bottle. The books are also held up by some bookends that I made. Pattern can be found here.
 The second shelf holds my A4 storage box from Kikki. K as well as the binder that I use to organize all of my current college handouts (I want to buy this one so that it matches the box). The elephant was a gift from my grandparents for my 18th birthday.
 The third shelf holds my college notebooks, my pens and my budget book, as well as my receipt book. These books are great and so simply for me to use when handling my finances. The rabbit is called Pinky and I have had it for years...
 The bottom shelf has a drawer which holds my text books from last year as well as other little bits and bobs. Which I of course labelled with my label maker.
 Here is a look at the whole thing, sorry it is a little hard to photograph because my bedside table is in the way.
How do you style your bookshelves? Do you like having a lot of things on display?

Wednesday, January 21, 2015

Chocolate and Blueberry Cupcakes with Chocolate Buttercream

Hi all!

Today I am going to share one of my favorite cupcake recipes. Chocolate and Blueberry Cupcakes (Yippee!). I love to make cupcakes, they are so yummy and you can change the flavor combination so easily. I have perfected my cupcake recipe after years of trying to find the best recipe for lovely soft and light cupcakes, so here you go.

Chocolate and Blueberry Cupcakes Print
 makes 12

Ingredients:
1/2 Cup Butter (softened)
2/3 Cup Sugar
3 large eggs
1 tsp vanilla essense
1/4 Cup Blueberries
11/2 Cup All Purpose Flour
11/2 tsp Baking Powder
2 Tbs Cocoa
1/4 Cup Milk

Directions:
 Preheat Oven to 350F and line 12 muffin cups with cases.

In your electric mixer beat the butter and sugar until light and fluffy. Add the eggs, one at a time, beating well after each addition. Beat in the vanilla essence. Add in the blueberries and mix them until combined.

With the mixer on low, add a cup of flour and mix until combined, then the milk until combined, followed by the rest of the flour, baking powder and cocoa. Mix until well combined and when the mixture has a mousse like texture. Scrape down the sides of the bowl as needed.

Evenly fill the muffin cups with the batter and bake for about 17-20 minutes or until just set and a toothpick inserted into them comes out clean. Remove from oven and place on a wire rack to cool. Once the cupcakes have completely cooled ice with buttercream.

Chocolate Buttercream

Ingredients:
13/4 Cups Powdered Sugar
1/2 Cup butter (softened)
1 tsp vanilla essence
2 Tbs Milk
1/4 Cup Cocoa

Directions:
In a electric mixer beat together the butter for 2-3 minutes until soft and creamy. Add the powdered sugar and cocoa and beat on medium until well combined.

Increase the mixer speed to medium and add the vanilla and milk. Beat for 3 minutes until everything is nice and creamy, but stiff enough to pipe.


Friday, January 16, 2015

My Desk

Hello!

Today I am going to share with you how I style my desk. I am a college student, so this is an important space for me to have and use. I think the thing that works with my desk is that I keep it tidy so that when I need to use it I do. Also because it looks great I don't mind so much when I do have to use it.

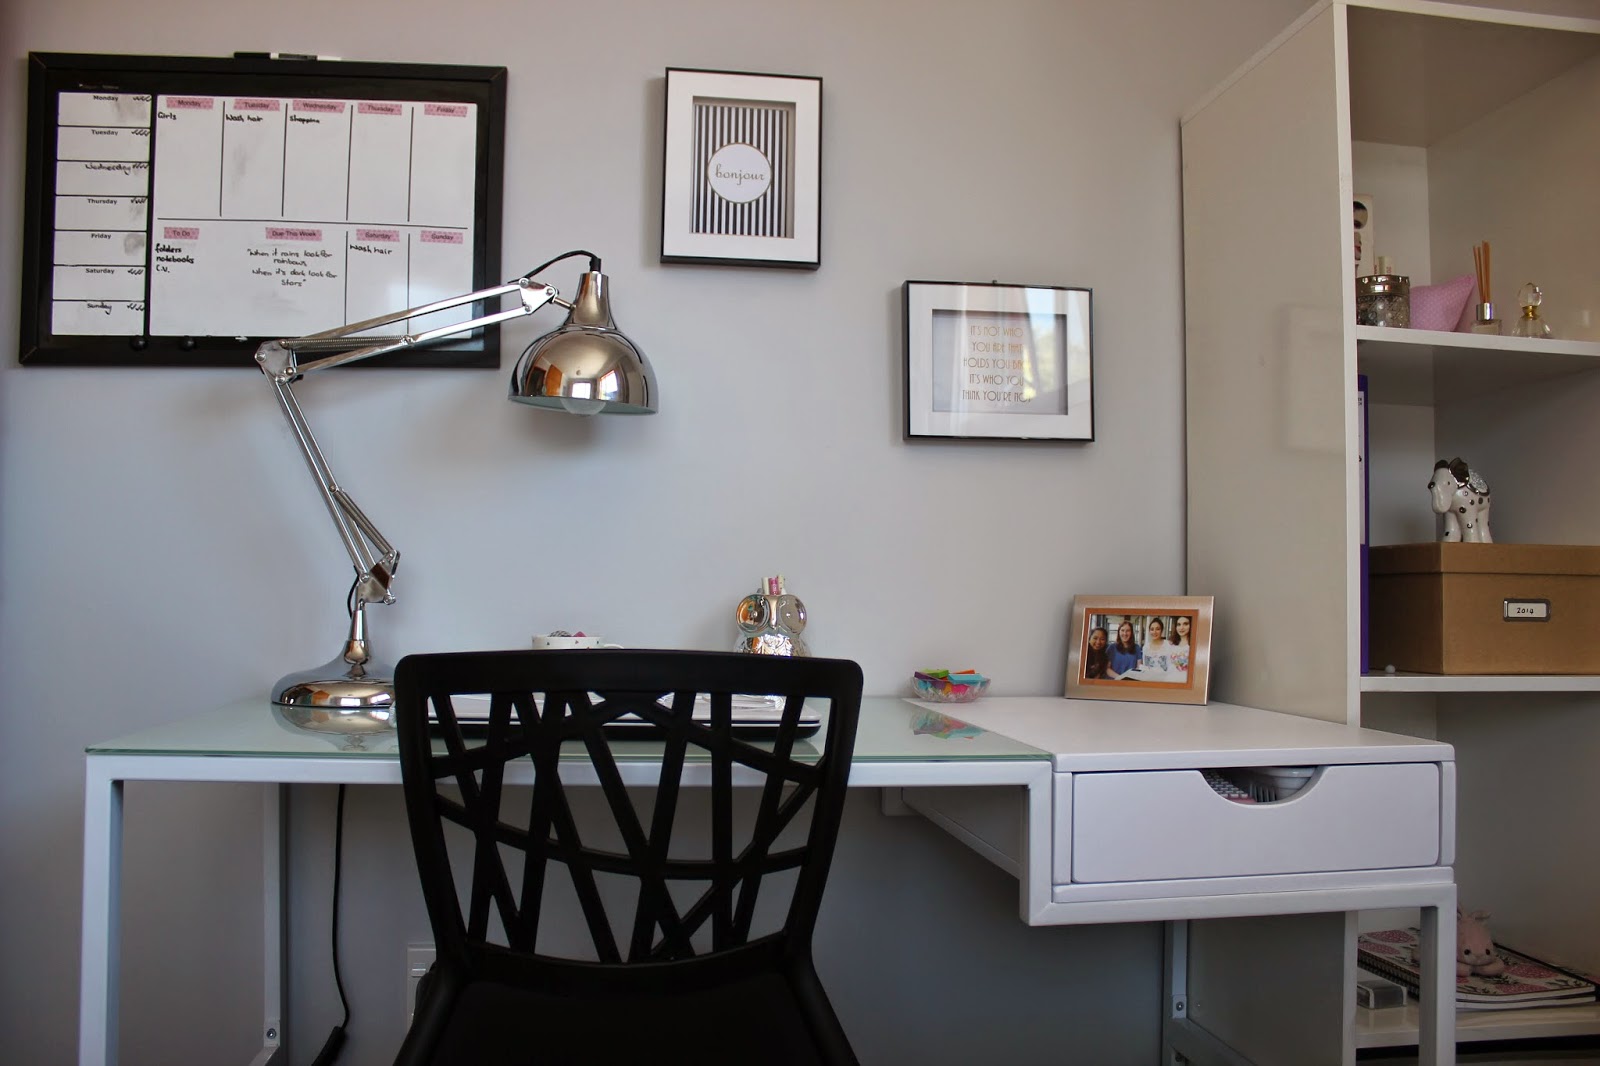
I bought the desk at Warehouse Stationery, I scored this one for $120, I originally wanted one with one long drawer on the front, but I couldn't seem to find what I was looking for on my budget. But I have now come to love the look of it (especially the glass top).

The chair I bought for $55 here and it is the perfect height for my desk as well as being super-duper comfy. I love that it is just simple as well as being easy to lift in and out, something that I find a lo t of chairs are not. I also love the fact that I managed to get it at 60% off (yay!).

The lamp was the one thing that I really love about my desk. I wanted something that was able to reach over so I could see what I am working on, because I sit with the window behind me it makes my workspace a little darker than I would like. This lamp was purchased here for $60 (yay 50% off as well).

The owl pen holder was a gift last Christmas, and it is amazing how it goes so well with my lamp now. The cup was bought from Kikki. K and with a $10 birthday voucher only cost me $2.90 (bargain!!). I did have a succulent in it but I may have over-watered it... So now it houses my washi tape collection. The frame was a gift from my grandmother and it has a picture of me and my friends, something that always makes me happy, as I only see a lot of them at this time of year. The crystal bowl with post-its in it is one of my grandmother's as well.

The most recent addition to my little study nook is my bookshelf, I had great fun styling this and I am still looking for extra pieces to help fill it up. So that will be revealed later.

Inside the drawer I have all of my pens, pencils, felt-tips and even some crayons as well as my label maker and tapes. The drawer also hold my calculator (in the case that I made for it), scissors, stickers, a notebook elastic from Kikki. K and my portable hard-drive. Also currently it has an old film canister covered with washi tape that I used to hold my headphones. 


Now I have a nice tidy and very adorable desk area that I love and will use often, mainly just because I feel important sitting at this desk.

What is your desk area like? Does it being cute make you want to use it more too?

Sunday, January 11, 2015

Back To College Organizing

It is now the start of a new year, which to me means that I will soon be back at college. As sad as it is that Summer will be over it is one of my favourite times of year, organizing all of my college notebooks, files and stationery.


I already have my 2015 planner. It is exactly the same as last years and can be bought here. I also went and bought some new pens from the same place (most of my supplies are from here). They are felt tip and come in a ten pack so you get a variety of colours.

I have also already purchased my favourite notebooks, from Typo. These are really great because they have two cardboard pockets which can hold an A4 piece of paper (so super handy when you have lecturers who like to give out heaps of handouts). I have labelled these pockets - Syllabus, so that I can always have it with me to check the dates, and Assignments, so I can print off the instructions of the things that are coming due.

I also use a binder to store all of the handouts with dividers to separate the different subjects. I put some washi tape on the tabs and labelled them with my label maker.

So I am all set for back to college. What have you still got to organize before you go back?

Sunday, January 4, 2015

Labelling and Filing

I recently bought a label maker. I have had my eye on one for quite some time now and I decided to buy it when I saw that it was 60% off.


So because I now have a label maker I decided it was a good time to re-organize my files. My files are stored in an accordion file, this is because I don't actually have all that many files at my age. So this is how I organized it.

Files are always a hassle, no matter what they tend to stack up and you can never seem to get rid of them. But I guess that is the point, these are the things that you need to keep. Things like birth certificates and loan details that you always need to have on hand, so this is a quick way that takes care of the organization.

First, I took everything out of the file and arranged them into categories, they already were in somewhat similar categories, but somethings just didn't seem to fit in these and always ended up in the misc. file. So once I arranged the piles of paper I then got my label maker out and made new labels for the categories.

I then arranged the categories into alphabetical order (you don't have to do this, you could group like with like), and then stuck the labels in place.

Next I went through all of the papers and shredded what I didn't need to keep, and placed them into their category file in date order (newest at the front).

Now my files are all organized and easy to access. Now what other things can I label?